This is one of the most simpliest way you can do this without messing with plugins. Here’s why I started doing it this way. I started out with a plugin called “all in one migration”, you probably heard of it before. It is suppose to take your completed wordpress site and back it up into a file you save on your computer. Then after you install wordpress on the new server, you install this plugin, import the file and walla you have your site back. Easy right?
Well unfortunately for me, it kept getting stuck at a certain percentage and after doing a lot of research, I wasn’t the only one experiencing this problem.
Also they (plugin developers) want you to pay for it if it’s over 500 mb I believe or something like that. So I decided to take things into my own hands, I watched a few videos, and read several articles on how to transfer a WP site to a new server without the headache of using any plugins. So, let’s jump right into it.
First thing, you will need to have is the access to the cpanel on both the hosting servers.
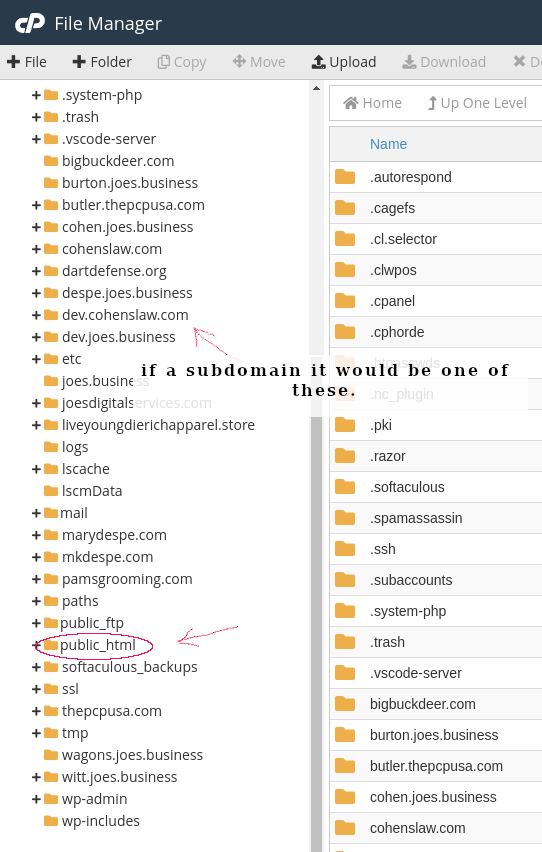
On the original server, fine the file manager icon and go to where your wordpress site is installed. If it’s the only site on this server it should be located in the “local_html” folder, if it’s a sub domain or addon domain it should be within that domain name.
Select all the files within this folder, you can do this by just clicking the “select all” option at the top and then click “compress”, this may take a few minutes, we’ll come back to this.
EXPORTING THE DATABASE
Go back to the cpanel and look for the PHPmyadmin icon, this looks similar to a sailboat icon on some cpanels and on others it will be a square with a disk in the center.

Not sure which DB to select?
If you have several databases and you do not know which one is for this particular site, here’s how you find out. Go back to your file manager and in the root folder of your website, look for the file named “wp_config.php”, click on it and click “edit” at the top. If you scroll down a bit it will show you the database name, username and password. All we want here is the db name. Now you know which one to get, so let’s continue on our little journey together.
Find the database of the website you want to move and click it, it should display all the tables on the right side, at the top click the “export” button and keep the default option under “export method” and click “go”. It will ask you where you want to save this file. I recommend you create a folder naming it the sites name and save it in here so it can be easy to fine later.
Now return to the file manager and the zip file should now be created, by default it will be called whatever your first folder is called such as .cgi-bin.zip, just click this and rename it. I normally call it something like “sitename-backup-date.zip”, you get the idea.
Once this file is renamed, click the “download” button at the top and save it in that same folder you saved the database. We are now done with the old server, now we need to log into the new server where things get a little more complex, are you ready? Let’s do it!
Adding your Site To The New Hosting
If you haven’t already, you will need to either bring in the domain as an add-on domain, which will create its own directory named as that domain. If this isn’t set up yet, you need to do this first. This is a whole new process that requires time and a lot of patients. If you want, I can create this content, just let me know in the comments below, in the meantime, you can Google search it, there are tons of knowledge out there on how to set this up.
Getting back to adding the site. Like before, find and open the file manager, navigate to the root directory of the domain name you want to add the site to. Upload that zip file you created by clicking the “upload” button.
Creating The New Database
While this is uploading go back to the cpanel, should be in the previous tab and look for something called “MySQL Databases”.

Here comes the interesting part where you want to take notes. I recommend to create a note of the databasename, the user and the password and save it in the same directory, just a simple notes.txt will do for this.
When you open the “MySQL Databases”, the first thing you see is “create a new database” that’s exactly what we want to do, go ahead and name it something short, but you know what it is for such as the site name but keep it short and click “create database”. It will take you to a confirmation page, copy this complete name within the quotes and paste it in your notes.txt file, you will need this later. Go ahead and click the “go back” link at the bottom.
Adding a User
Next, scroll down until you find “MySQL Users Add New User”, I normally keep it the same as at DB name I created before to keep things simple, go ahead and create this name, click the button that says “password generator” it will show you the password, copy this and put it in your notes.txt file, tick the checkbox “I have copied this password in a safe place.” and click “use password”. Make sure to save your file after pasting this!
Adding the user to the Database
The next step is to add this user to that database, select the user you just created and select the database and click “add”, tick the option to add all privileges, make sure all options are checked and click “make changes” at the bottom, and now click “go back”.
Importing the database
WOW, that was a lot of steps I know, but that’s all we need to do here, next, we are now ready to bring in our database that we exported. To do this, open the “phpmyadmin”, if you remember it looks like a sailboat icon. Click on the database we just created and click the “import” button and chose the .sql file we downloaded earlier.
Thank you for reading this post, please see my other posts by going to the blog page .